You've planted your garden. All the lovely vegetables are growing. Consider saving a plant just for harvesting seeds. Seed saving is a great practice that can help give sustainability to your garden for years to come. It's easy to harvest and save seeds from many different plants. Most of the time, you just have to let it grow and grow and grow. Some plants, like tomatoes, are a bit more complex. Tomatoes are filled with a gel like fluid that contains chemicals to prevent germination. Convenient for the tomato, but it definitely adds difficulty for the seed saver. With this easy tutorial, you'll be saving tomato seeds for next year's planting season in no time!
You will need:
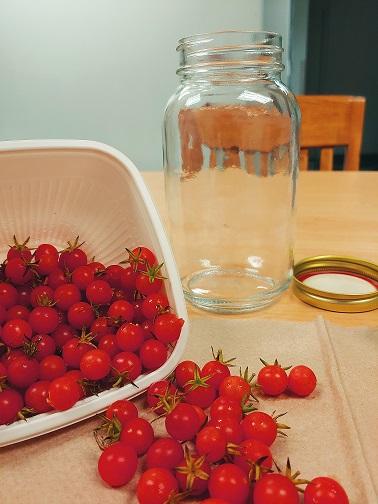
- vine-rippened tomatoes
Tip: Pick the best and ripest tomatoes so that you will be saving the best seeds you can. Plants grown from Heirloom seeds are preferable for saving. For this demonstration we used Heirloom Everglade Tomatoes from the Seed Saving Garden at Tower Road Library. It's best to avoid using hybrid plants. - a clean clear mason jar with lid (or any jar that has a separate plate and screw top lid)
- cheesecloth or paper towel
- metal mesh strainer
- water
- spoon (optional)
First, we need to get the contents of the tomatoes into the jar. You can do this by scooping out the insides with spoon if your tomatoes are large enough. If they are smaller, you can just squeeze them until they pop.
(Watch out! You may need safety goggles.)
Tip: you can use the remainder of the tomatoes in your cooking or add it to your compost.
Step 2: Water please
Next, add 1/4 to 1/2 cup of water to your jar. You don't need a lot, just enough create some separation during the fermenting process. Once this is done, cover the jar with either the paper towl or a piece of cheesecloth. Then screw on the lid without the plate so that the jar's contents can breathe.
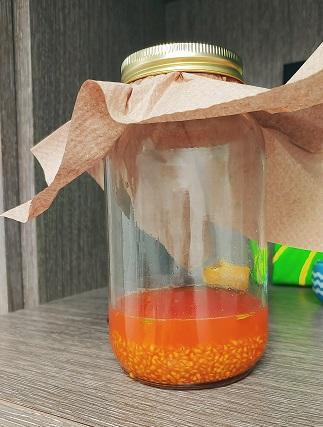
Step 3: The waiting game
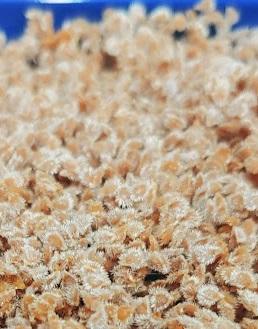
You will need to wait 2 to 4 days, so make sure the jar is in a safe place that won't be disturbed. During this time, fermentation will be occurring inside the jar. The good seeds will sink to the bottom, the unripe seeds will float on the top, and a mold covering will begin to grow over the top. This is usually the sign that you can rinse and dry the seeds. You can see in the picture to the right that the covering is light. This was noted on day three. We waited an additional day before proceeding just to make sure.
Step 4: Rinse
There are several ways to do this step.
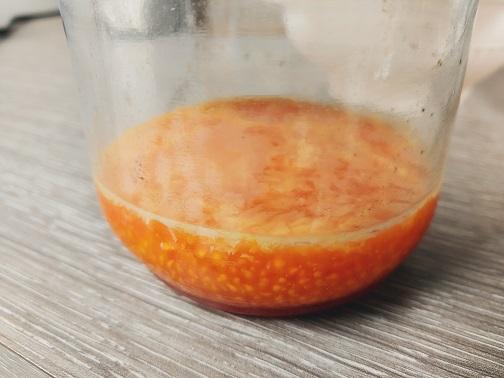
If you picked ripe tomatoes there shouldn't be a lot of bad seeds floating at the top. We did 3 separate harvests during our documentation process and found very few floaters*. So we simply poured the seeds through a metal
*Tip: If you find you have a lot of floaters or there is significant mold growing, you will want to carefully pour the floating seeds and mold out before straining the rest. I recommend doing this into a bowl or bucket in case you over pour.
Step 5: Dry the seeds
It may take a couple of days for the seeds to dry. During this time, press the seeds to the mesh as needed to strain out the water and carefully break up any seed clumps that have formed.
Storage:
You're almost done! We recommend storing seeds in paper envelopes you can label. Put the date, the type and variety of seed you have on the label in case you save other seeds too. You can also store seeds in sealed jars. You want to keep them in a dry, cool temperature-controlled environment.
How long can I store my seeds?
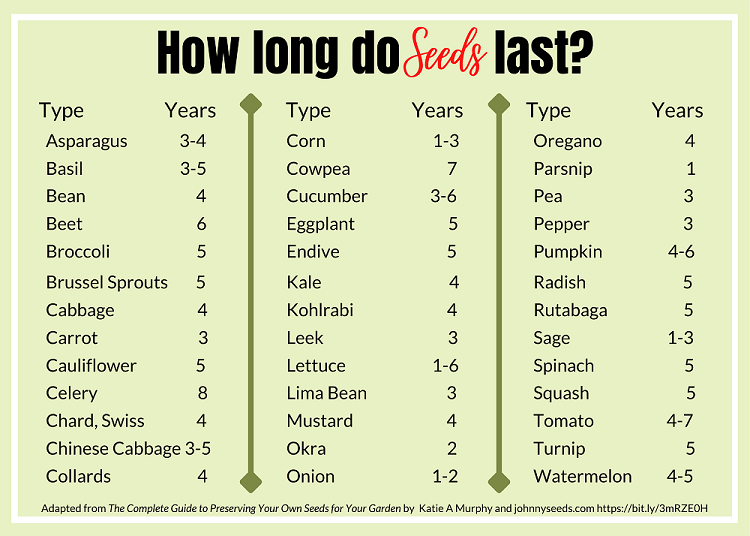
This handy graphic shows some of the most common vegetables and herbs and tells you roughly how long they will last in optimal storage conditions. For more plant information you can check out the book The Complete Guide to Preserving Your Own Seeds for Your Garden by Katie A. Murphy or this PDF document made by Johnny Seeds.
How can I tell if my old seeds are still good? How do I know if the seeds I just saved are good?
You can do a germination test on the seeds. Check out this great tutorial on how to germinate seeds. For seed saving, use 10 seeds from your collection. This will give you a percentage rate of good seeds. If 7 seeds sprout, your rate should be about 70%. If 3 seeds sprout, it would be 30%. Don't forget to add the germination date and outcome to your label.
What can I do with my seeds beside plant them?
You can swap them with other gardeners or donate them to any of the seed libraries in the county or to one of the seed collectives, such as Working Food's Seed Collective Program.
Recommended books:
Saving seeds: a home gardener's guide to preserving plant biodiversity by Dan Jason
The garden seed saving guide: easy heirloom seeds for the home gardener by Jill Henderson
You can also check out this list on seed saving books.
Check out our collection for additional information on seed saving and gardening.