Make a Dreamcatcher

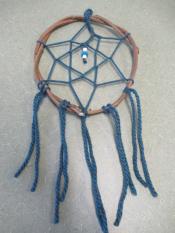
Dreamcatchers are fun to make; they require focus and care to construct. They also make great gifts for the holidays. The dreamcatcher is attributed to the Ojibwe tribe of Native Americans. The dreamcatcher’s purpose is to hang above the dreamers’ bed and trap bad dreams. Making dreamcatchers is hard at first but gets easier the more you make them. If you like making things with sticks, string and beads, this craft is perfect for you.

Supplies needed:

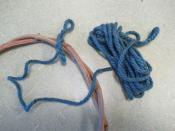
  • 1-arms length of grape vine
  • 3-4 arm-lengths of colorful yarn 
  • Beads
  • grown-up helper

Step 1: The hoop

Image
dreamcatcher step 1

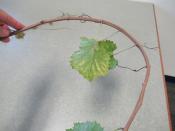
Go out with your helper and find some wild grapes along the roadside. Cut an arms-length for each dreamcatcher.

Make sure that your vine bends easily, otherwise it won't curve into a hoop.

Remove leaves and tendrils. This can be done by hand or with clippers.


Image
3
Hoop the vine


Image
3is4
Loop and tuck the ends into the hoop. 


Image
5
Once your hoop is complete, you can snip off any ends, or you can leave them. 

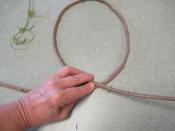
Your hoop is ready for the web. 


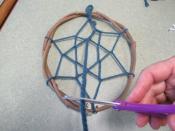
Step 2: Making the Web

Image
9
Measure off three to four arm lengths and cut. I wound the yarn onto my fingers to make it easier to work with. 

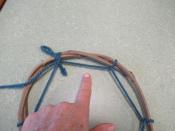
Tie the yarn to hoop. I like making a loop up top for hanging but it is not necessary. 


Image
10
Pull the yarn to the right of the knot creating a loop over top of the hoop.

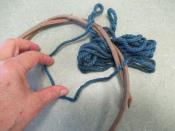
Pull the yarn under the hoop and through the inside of the loop. 

Space the loop so its a handswidth from the knot to the hitch.
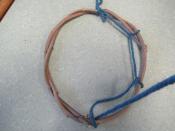
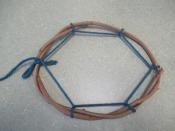
 

Image
11
In this picure I am pulling the yarn snug. The first loop is complete, spaced a hands-width from knot to hitch.


Image
13
In this picture I am pulling on the third loop hitch.


Image
17
In this picture I have completed my first layer of six loops.


The second layer

Image
18
The second layer gets hitched to the middle of first loop where my finger is pointing.


Image
19 layer2
Here I am pullling the yarn which is hitched to the first loop making it snug


Image
20
I have made a second loop hitched to the second of the first layer loop. Its important to stay focused on going in the same direction. 


Image
21
The third loop of the second layer is hitched tight.


Image
22 all around
I have completed the second layer of loops and now have a star. I can continue making a third layer OR tie it off and hang beads. This is a good time to get your helper for the tie-off.


Image
cut
In this picture I have tied off my yarn to the loop and am cutting the yarn long enough to hand and knot some beads. 


Image
beads
I have threaded some beads and will tie a knot under them so they don't slip off. 


Image
strand
Here I am tying a folded dangling yarn in the middle. I can tie more beads or not. 

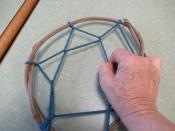
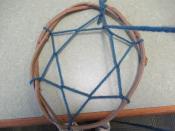
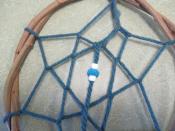
In the last picture I have finished tying five folded strands of yarn.


Image
Photo of completed dream catcher.
The dreamcatcher is complete and ready to hang over the bed with the help of your helper. 


MORE

We have a great book called Learning About Native Americans with Arts and Crafts that is filled with simple Native American crafts and facts.

Find more crafts and activities in our catalog or visit Creativebug for ideas of crafts for kids. 

By JoanneT on October 6, 2020