The concept of Tunisian crochet can be intimidating. There are crochet hooks specially made for it, you end up with yarn everywhere, and it can be hard to know where exactly to start. But once you get into it, it's just another type of stitch.
Whether you're a seasoned pro or just starting out, Tunisian crochet can be a fun new technique to try out. Continue on for some tips and tricks for teaching yourself this new type of crochet.
And if you're brand new to the idea of knitting or crocheting, check out our awesome eSource Creativebug. You can find all sorts of helpful tutorials for learning these crafting techniques. And once you're well-versed in the art of crochet (or, yes, I guess knitting too), you can come back here to tackle Tunisian!
Considered by some to be a hybrid between knitting and crochet, Tunisian crochet is worked with a crochet hook but in forward and backward passes. In the forward pass, all of the stitches end with a loop left on the hook. In the backward pass, the loops are worked off, ending the stitch and setting you up for the next forward pass.
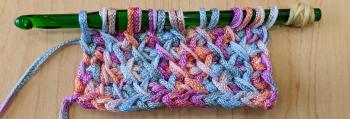
There are a lot of things you can do with Tunisian crochet, from afghans to sweaters to home decor. This is a baby blanket I'm working on right now (click the image to see the pattern I'm using):

But you don't need a special cabled crochet hook like the one above to get started. Instead, you can teach yourself new stitches by making small swatches with one regular crochet hook.
Note: this tutorial assumes some prior knowledge of crochet, but you don't have to be a master. If you're unfamiliar with some of the concepts included below (such as yarn over, chains, or single crochet), I encourage you to check out some of our general crochet books, look at tutorials online, or search Creativebug before continuing with the rest of this program.

As with other types of knitting and crochet, you can use pretty much any yarn weight for Tunisian crochet. However, it may be harder to work with thinner, lighter weight yarns, because it will show the back (or wrong side) of the stitches more easily and there may be fewer patterns available online and through books. My recommendation, especially when learning, is to work with a light color worsted weight (#4) yarn, because it's a pretty standard weight for patterns—and with a lighter color, you can see the stitches a lot easier!
A note on novelty and self-striping yarn: these yarns can be very cool in a finished product! But they also can be very difficult to work with when first learning a new technique, and can make it hard to see more textured stitches (not to mention mistakes). I would highly recommend working with a single color acrylic yarn for the learning process, as acrylic yarns are less expensive and more forgiving of mistakes and a lot of frogging.
Though Tunisian crochet hooks can be very helpful when making large projects, such as a sweater or afghan, they aren't always necessary. For this project, you can just use a regular crochet hook. However, you'll want to be sure that it's not one with a pronounced handle or finger grip section; these inconsistencies in size can make it hard to work the forward and backward pass properly.
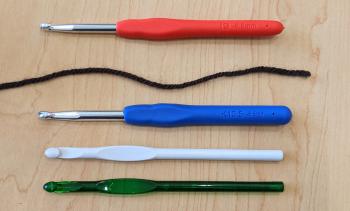
Additionally, when working in Tunisian stitches, you'll want to pick a crochet hook that's one or two sizes larger than recommended for the yarn. This is because Tunisian crochet tends to be a very tight, stiff stitch, and the bigger hook ensures it stays loose and flexible. So for a worsted weight yarn, which normally calls for an I-9 (5.5mm) hook, you might want to consider a J-10 or K-10.5 hook. I know that I tend to have really tight stitches, so I picked a K-10.5 hook for working with worsted weight yarn.
In the photo above, the best hooks for this purpose will be the white and green plastic ones at the bottom. They are two sizes larger than recommended for the yarn shown and they do not have promiment ergonomic grips. Though they do have flatter spots for the grip, they're not overly large, and you can avoid any issues by making sure that your stitches are nice and loose.
In order to turn your regular crochet hook into a Tunisian crochet hook, all you need is a rubber band or hair tie!

Wrapping the rubber band around the end of the crochet hook keeps all the loops on the hook when you're working on your forward pass. This is especially important if you have a lot of stitches relative to the length of your hook—while you don't want so many that you can hardly move back and forth, it's very possible that you may have slightly more stitches than your hook can comfortably hold, and so it's good to have the stopper there just in case.
Once you've got your yarn picked out and your hook all set up, it's time to move on to actually learning different stitches!

There are a lot of resources out there on Tunisian crochet stitches, both in books and online. I've included some books below that have introductory sections with different stitches, but you can also check out videos on YouTube or text- and photo-based tutorials online. Some of my favorite online resources are CrochetKim (text-based) and TL Yarn Crafts (video-based). However, follow along below for the very basics of starting a Tunisian crochet swatch.
1. Chain
Just like in regular crochet, you'll want to chain a certain number of stitches to begin. Unlike regular crochet, you don't need to add any chains to begin the first row of regular crochet. This is because the loop on the hook counts as the first stitch in the forward pass. So when I make a swatch that's 15 stitches long, I start with 15 chains.
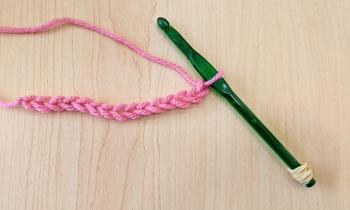
This is where the similarities between regular and Tunisian crochet end, for the most part. Unlike in regular crochet, where you turn your work, in Tunisian crochet you are always working with the "right" side facing you. You'll be able to tell the difference as you complete more rows, because the front (right side, or RS) will look like the desired stitch, and the back (wrong side, or WS) will look similar to a purl stitch in knitting—A.K.A. very bumpy.
Some people like to begin their Tunisian crochet with a regular row of single crochet, but I find that it can alter the width of the work and look disconnected from the rest of the stitches. Instead, I like to start with the basic forward and backward pass, shown below.
2. First Forward Pass
The first forward pass is also different from the first row in regular crochet. Instead of working your hook into the V on the front of the chain, you'll want to rotate the work so you can see the bump on the back. Skip the first chain. Insert the hook through the back loop of the second chain, yarn over, and pull up a loop. Now, leave the loop on the hook. This is very important! All through the forward pass, you'll leave each loop on the hook, so you'll end up with 15 loops total. Make sure each loop is reasonably loose, otherwise, it'll make it difficult to complete the backward pass and have a consistent tension.
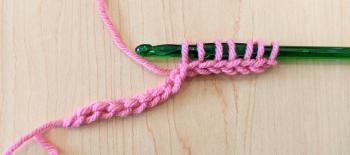
Note the V-shape beneath each loop on the hook in the above photo. This is the front side of your chain, the one you would traditionally work into. A good way to tell if you're inserting your hook into the correct loop is to check the front of the work for that V-shape. If it's not there, try again! You can also see, on the unworked chains to the left of the hook, the back bump of the chain.
This is another place where yarn tension is very important. If you made your chains too tight, it will be very hard to insert the hook into the correct loop. If this is a consistent issue for you, try going up a hook size just for the chains, and then returning to your "Tunisian" crochet hook for the forward pass.

When working both the forward and backward pass, I like to keep the loops bunched closer to the working end of the hook. This can make it easier to work the stitches as desired. Just be sure that you don't have them too bunched or close to the end, because it can be easy for loops to accidentally fall off!
3. First Backward (or Return) Pass
Unless indicated otherwise by the pattern, the backward pass will always be worked the same. Begin with a yarn over and pull through one loop on the hook. This is the end chain, and will help to keep a neat edge to your work. You can tell it apart from the rest of the stitches because it will have the same V-shape as the chain at the bottom of the work.
After the end chain, yarn over and pull through two loops on the hook. Repeat until you reach the end of the work. The result of this will be a row where you can see two vertical bars in each stitch, one on the front of the work and one on the back.

Often in Tunisian crochet, you will be working around, inside of, or between those vertical bars. The difference is what makes the distinct stitches.
When you've completed a backwards pass, your stitches might look awkwardly tall. Don't worry! When you start your next forward pass, the top portion of the stitch will be rotated back and it will make the stitches a more average height. This is also what makes the back super bumpy, because you're working into the front of the stitch instead of the top (as you do in traditional crochet), and what makes Tunisian crochet curl so much. Making your stitches taller and looser can also help combat the curl.
4. Start the Stitch (next forward pass)
This is when you begin your desired stitch! There are a lot of different types of Tunisian crochet stitches out there, and more are being created every day, but there are some you'll encounter more often than others. For the example photos below, I am working the Tunisian Simple Stitch (TSS), using the tutorial found on page 30 in Tunisian Crochet Workshop by Michelle Robinson as my guide.
Every type of stitch will also be worked in the Forward Pass/Backward Pass method, with one combination (Forward + Backward) equaling a single row in the traditional sense.
For the Tunisian Simple Stitch, you will want to skip the first bar that is directly beneath your hook. This part is what makes the beginning chain, similar to the end chain discussed in the backward pass above. Insert your hook side-to-side (right to left for right handed crocheters, and vice versa for lefties) under the front vertical bar. Now yarn over and pull up a loop. Remember to keep this loop on the hook for the entire forward pass. Repeat until the last stitch.
In the photo below, you can see the vertical bar just to the left of the loop on the hook.

When you reach the last stitch (the end chain), turn the work so you can see the side, and insert your hook into both loops of the V-shape. This will keep the shape of the end chain for each forward pass. In the photo below, I've inserted a paperclip into the loops to demonstrate where to insert your hook.
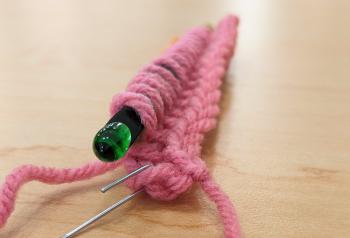
Then yarn over and pull up the final loop of the forward pass.
For TSS, the backwards pass is very simple: it's exactly what I described in Step #3 above! Yarn over, pull through one loop on the hook. Then yarn over and pull through two loops, repeating until you reach the end of the row. This is not always the case, however, so be sure to double check the instructions before beginning a backwards pass.
Continue with your forward and backward pass until you have enough rows that your swatch is roughly square in shape (or rectangular, if you prefer!). Then, finish off.
Before we get into finishing off, let's talk about mistakes real quick. They happen, and that's understandable. When I was a few rows into my TSS swatch, I realized that I had 16 loops on my hook instead of 15. When I went back and counted the first row, there was also 16 stitches there, but in my chain photo (above) I only have 15 chains. I'm fairly certain it's because I forgot to skip the first chain when doing my first forward pass (*gasp*). But did it ruin my work? Not at all. Mistakes are all part of the learning process!
I will also admit to having to frog part of my work, however, because at one point I realized there was seven rows on the right side of the swatch but only six rows on the left. I don't have any idea how I managed that one.
5. Finish off
Because crochet stitches are always taller than they are wider, I only had to crochet 12 rows to get a vaguely square-ish swatch. Once you've finished your last backward pass, you're going to be binding off with a simple slip stitch.
Insert your hook side-to-side under the second vertical bar (skipping the one beneath the hook). Yarn over and draw up a loop. Draw that loop through the loop on your hook. Repeat to the end, where you will still insert your hook through both strands on the edge of the work. Finish, leaving a long tail for sewing.
Ta-da! You've completed your first Tunisian crochet swatch!
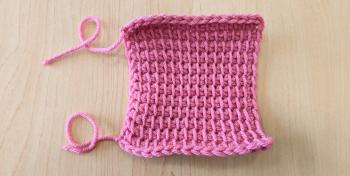
You may have noticed at this point that your work is curling. While sewing together your swatches in the next section can help with this, there are other ways you can lessen any curling.
In Tunisian Crochet Workshop, Michelle Robinson discusses techniques to combat curling in Tunisian crochet. You can also block your work, but because different fibers require different techniques to block effectively, I would recommend you search on Google first to find the right information for your yarn!
+1. Experiment!
Using books and online tutorials, you can create swatches with any Tunisian crochet stitch you want to try your hand at! Try out changing colors or stitches that don't make sense at first—and don't be afraid of mistakes! At one point, I tried to make a swatch in two colors with a honeycomb stitch. It turns out that the honeycomb stitch isn't the best one for color changes, because it distracts from the texture, but that's part of the learning experience!
Once you're satisfied with the number of swatches you've made, feel free to move on to the next section.
Note: some stitches require that you start with a certain number or interval of chains, so keep that in mind when creating your swatches. They may end up being different sizes if you vary the number of chains too drastically. (This is, unfortunately, somewhere where it's more important to catch mistakes as they happen. Having the incorrect number of stitches can negatively affect the overall stitch pattern.)

Once you've started making swatches, the possibilities are endless! Similar to Granny Squares in traditional crochet, these Tunisian crochet swatches can be sewn or crocheted together into any number of finished objects. TL Yarn Crafts (mentioned above) has a really cool tutorial for a Holiday Sampler Blanket that uses the same idea discussed here, making lots of different squares with different stitches to create a fun and unique holiday themed blanket.
When making multiple swatches that will end up in the same finished object, I recommend using the same yarn weight throughout. This ensures that your swatches are roughly the same size, making it easier to sew them together at the end. That being said, if you want to make swatches of all different sizes with different yarn weights, be my guest! You might end up with a really cool asymmetrical tapestry (or other project)!
For this section, I used the method detailed in TL Yarn Craft's Assembly and Finishing video. You can head right to that link to watch the video, or continue below for the highlights.
1. Arrange your swatches
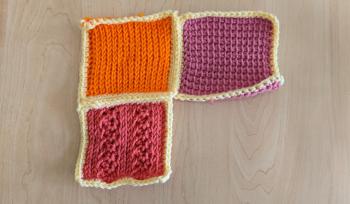
This step is mostly optional, but it might be a good idea of how you want your swatches laid out before you begin sewing them together. Because I ended up with so many pink swatches, the majority of my arranging was concerned with how to have the pink evenly distributed.
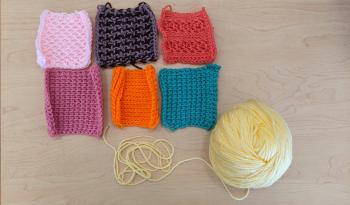
Once your satisfied with your layout, it's time to move on! Though I would recommend taking a picture of the arrangment before you start moving stuff around; otherwise, you might end up forgetting where you wanted certain squares (I did).
2. Crochet a border
The first thing to do before joining your swatches together is to crochet a border around each square. This will help keep things around the same size and help with the joining together in the next step.
You can use just about any color of yarn you want, so long as it's around the same weight/thickness as your other yarns. I went with yellow, because I wanted everything to be bright and colorful. For the border, I used an I-9 hook, the recommended hook size for the yarn weight I was working with.
Insert your hook into an edge stitch and begin single crocheting—it's that easy!
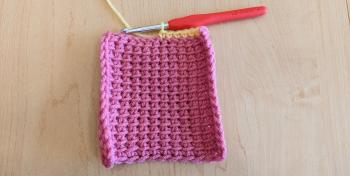
When I reached the corner on each swatch, I used a slightly different method than the video above. I prefer to bulk out my corners by crocheting three to five single crochets into the same stitch. This fills out the corner and keeps the right shape for when you go to join the swatches.
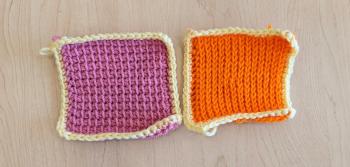
3. Block (optional)
This step is also optional. Blocking your work can help to keep it even and a consistent size. For this project, I didn't worry about blocking the squares, because I'm just trying to teach myself a new skill, rather than make a perfect finished product.
4. Join the swatches
Once you've crocheted a border around all your swatches it's time to join them together. (TL Yarn Crafts' video is really helpful for understanding this section.) I used a J-10 hook for this section to keep my slip stitches nice and loose.
Take two of the swatches you want to join together. Align one edge so that the wrong sides are touching and the right sides are facing out.
Starting at the right corner of the swatches, insert your hook into the inside loops of each single crochet (the "back" loop of the swatch closest to your hook, and the "front" loop of the swatch farthest from your hook, relative to how you're looking at it). Yarn over, pull up a loop, and pull the loop through the one on the hook. This is—you guessed it—a slip stitch.
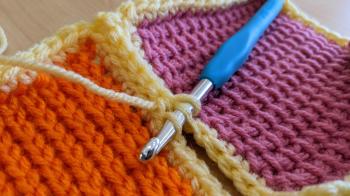
Slip stitch until you reach the end of the edge. You can pick up your next swatch and continue on this way if you'd like, but I cut the yarn and tied it off before moving on to the next one. This let me assess how it looked and which side I wanted to start with next.
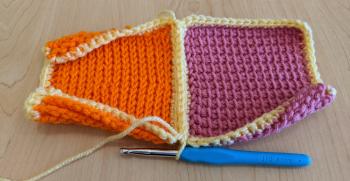
Keep adding swatches until you're satisfied with the end result. Your project could end up being a small wall tapestry (what mine will end up being, I think) or you could continue to add swatches as you make them until you have a blanket! And don't feel like you have to limit yourself to just Tunisian crochet—you can make swatches with regular crochet stitches, knit stitches, or something else entirely.
5. Final edge border
Whatever size your finished product ends up as, the last (optional) step is to add a final border around the edge of the whole work. This could be the same color as your swatch border/joining, or something else.
There are a lot of different edge borders out there. TL Yarn Crafts chose to do a half double crochet into the backloops only (a look that I also like a lot), but there are plenty of other options out there for you to choose from!
And once you've finished your project, feel free to share it with us on social media! We're on Facebook, Twitter, and Instagram.


One of the best resources for you to check out is the library eSource, Creativebug! While Creativebug doesn't have any tutorial specifically on Tunisian crochet, you can learn to knit or crochet with their easy-to-follow tutorials, and you may find patterns that can be adapted well to Tunisian stitches. To check it out, just click on the image to the right and then enter your library card number in the correct field when prompted.
Check out these books in our collection for more stitch tutorials and Tunisian crochet patterns:
Beginners´ Guide to Crochet

Our Beginner's Guide to Crochet is the perfect companion for you to take your first steps in crochet. We'll show you easy stitches and techniques to get you started, with fun projects for you to practise your new skills! What's inside:
- Essential tutorials and easy step-by-step instructions for both left- and right-handers
- Quick, simple patterns to help practice your skills
- Packed with information about each technique.
The Tunisian Crochet Handbook: A Beginner's Guide

by
From fiber artist Toni Lipsey of TL Yarn Craft, an introduction to the craft of Tunisian crochet—a unique crochet style that looks more like knitting—with 20 projects for beginners.
There are hundreds of books that explore traditional crochet, but there are few that reference the concept of Tunisian crochet or present it in a modern, approachable way. The Tunisian Crochet Handbook introduces this fascinating and rewarding technique with a wide array of stitches and design possibilities.
The goal of this book is to guide crocheters step-by-step through Tunisian crochet, starting with tools and yarns, transitioning into how-to’s and stitches, and finishing with easy but engaging patterns.
Every shawl, garment, and accessory featured takes makers beyond the basics, introducing new stitches to expand their skill sets. In this way, author Toni Lipsey is reintroducing crochet and encouraging makers to explore the craft further with each new design. Crochet continues to grow in popularity, and this guidebook offers a new take on the timeless classic, one that readers won’t be able to find anywhere else.
Includes instructional sections and patterns, complete with the necessary schematics and styled, chic photographs.
Tunisian Crochet Workshop: The Complete Guide to Modern Tunisian Crochet Stitches, Techniques and Patterns

by
Ever wondered what Tunisian crochet is and how to get started? This fantastic workshop will help you on your way to mastering Tunisian crochet with step-by-step instructions, easy-to-follow stitch patterns, and 12 stunning projects. This comprehensive guide has something for everyone - from complete beginners to those who have learned the basics but now want to expand their skills. Set out in a workshop format, graduating from the basics through to more advanced techniques with 16 lessons giving clear instructions and step-by-step photos as well as handy hints and tips along the way. This invaluable reference guide can be used by novices starting from the very beginning and working their way through each lesson, developing their skills and knowledge as they go. Or, for those who have already tried Tunisian crochet but want to learn more, they can pick up from the Beyond the Basics section to learn many new stitches and stitch patterns, new techniques including shaping, joining, colourwork, working in the round, and more. In addition to the ongoing swatch project added to throughout the lessons, the Projects section includes 12 beautiful, contemporary designs to hone your new skills, ranging from fashion accessories to decorative home wares.
Tunisian Crochet Stitch Dictionary: 150 Essential Stitches with Actual-Size Swatches, Charts, and Step-by-Step Photos

by
Learn how to make projects that look like knitting but are worked like crochet! Tunisian crochet produces a fabric that is similar to a knit but is worked on a hook. It combines the best of knitting and crochet, creating a dense, durable fabric. Tunisian Crochet Stitch Dictionary is a must-have crochet book that's an essential resource for anyone in the crochet and knitting community! Featuring 150 of the most popular and most used Tunisian crochet stitches, this reference book is filled with step-by-step instructions and coordinating photographs to help you achieve stitch after stitch, from beginner to intermediate to advanced. From basic stitches, fans, shells, and cables to lace, waves, chevron, and cross stitches, plus embellishments, edgings, and more, a detailed section on essential crochet skills, techniques, and other fundamentals are also included. Additionally, actual-size swatches so you can easily see if you're getting it right and helpful charts are featured, as well as consistent yarn weight being used throughout for easy stitch comparison.
The New Tunisian Crochet: Contemporary Designs for Time-Honored Traditions

by
Tunisian crochet has been used to make garments since its invention in the 19th century. From the popular children's garments of the 1800's to the new shapes it's taking in our time, Tunisian crochet follows a rich tradition. This book will open doors for those intrigued with Tunisian crochet--both by updating older concepts with contemporary styles and yarns, and inventing new ones for today's crocheter and her family. Tunisian crochet makes a fabric quite unlike either crochet or knitting; it is more elastic, lighter in weight, and drapes differently. It can also be stretchy, springy and firm. These qualities can be used to create garments from delicate lacy shawls, to snug hats and mitts, to jackets and skirts. To better explore the possibilities of this technique, the book provides 20+ Tunisian stitch patterns showing a variety of possible fabrics one can create. Then 12 projects show many of these stitches at work in a variety of garments, accessories, and home projects. Several designers contribute patterns, better illustrating the wide range of interpretations Tunisian crochet is undergoing today.
Unexpected Afghans

by
Unexpected Afghans presents 29 innovative interpretations of a favorite at-home essential. From best-selling author Robyn Chachula comes an in-depth look into crocheting traditional afghans using contemporary techniques, colors and patterns. Expert designers including Kristin Omdahl, Kathy Merrick, Kimberly McAlindin, and many more, provide an abundance of fresh patterns and projects that are perfect for new and advanced crocheters as they start out beginner-friendly and become more complex, allowing a crocheter to build skills and confidence. Designers at any level will enjoy: A detailed technique's workshop in every chapter including cables, motifs, color, lace, and Tunisian crochet. Helpful tips from designers for working through each afghan project. Easy-to-follow charts and diagrams. Along with tons of beautiful afghan projects for all skill levels, you'll find many of your favorite designer's biographies--giving you an exploration into their inspiration.